LangChain4j之聊天记忆
AIService(人工智能服务)
什么是AIService
其实在前面我们在阅读langchain4j的文档中,就看到了这个AIService,只是没有提到:
<font style="color:rgba(0, 0, 0, 0.8);background-color:rgb(247, 247, 249);">AiService</font>是一个注解,定义如下:
1 | @Service |
<font style="color:rgba(0, 0, 0, 0.8);background-color:rgb(247, 247, 249);">@AiService</font>注解,用于标记一个接口,使其被框架(如 <font style="color:rgba(0, 0, 0, 0.8);background-color:rgb(247, 247, 249);">langchain4j</font>)自动处理,生成AI服务的实现:
- 动态代理:框架会基于该接口生成代理类,处理方法调用(如
<font style="color:rgba(0, 0, 0, 0.8);background-color:rgb(247, 247, 249);">chat(String message)</font>)。 - 依赖注入:标记的接口会被 Spring 容器管理,允许通过
<font style="color:rgba(0, 0, 0, 0.8);background-color:rgb(247, 247, 249);">@Autowired</font>或其他方式注入。 - AI 功能集成:注解会将接口与 AI 模型(如 OpenAI 或其他语言模型)绑定,自动处理请求和响应。
举个例子,这里我们定义了一个名为Assistant的接口,然后使用<font style="color:rgba(0, 0, 0, 0.8);background-color:rgb(247, 247, 249);">@AiService</font>注解标记它,这样这个接口就会被自动处理,生成AI服务的实现:
1 | @AiService |
<font style="color:rgba(0, 0, 0, 0.8);background-color:rgb(247, 247, 249);">AiService</font>使用面向接口和动态代理的方式来完成程序的编写,以更灵活的实现高级功能。
链 Chain(旧版)
链的概念源自Python中的LangChain,其理念是针对每个常见的用例都设置一条链,比如聊天机器人、检索增强生成(RAG)等。链将多个底层组件组合起来,并协调它们之间的交互。链存在的主要问题是不灵活。
AIService的作用
在LangChain4j中,我们可以使用AIService来完成复杂操作,它的底层组件将由AIService进行组装。
AIService可处理最常见的操作,如为大语言模型格式化输入内容、解析大语言模型的输出结果,同时还支持更高级的功能,如聊天记忆(Chat Memory)、工具(Tools)和检索增强生成(RAG)。
创建AIService
点击 这里,查看与SpringBoot的集成,这是langchain4j的高级功能:
第一步,在pom文件中新增如下依赖:
1 | <!--langchain4j高级功能--> |
第二步,新建一个名为assistant的包,并在该包内定义一个名为Assistant的接口,里面定义一个chat方法:
1 | public interface Assistant { |
第三步,新建一个名为controller的包,并在该包内定义一个名为TestController的类,里面定义一个testChat方法:
1 | @RestController |
这我们通过注入OllamaChatModel对象,然后调用AiServices的create方法,传入Assistant类以及OllamaChatModel对象,这样让返回的Assistant具备Ai功能。
第四步,启动项目,访问如下接口:
1 | http://localhost:8080/test/testChat |
页面显示内容如下:

实际上我们可以直接在自定义的Assistant接口上添加@AiService注解,由于我们在配置文件中同时配置了多个大语言模型,所以需要在这里明确指定(EXPLICIT)模型的beanName,即此处为ollamaChatModel:
1 | @AiService(wiringMode = AiServiceWiringMode.EXPLICIT, chatModel = "ollamaChatModel") |
然后我们修改TestController类中的代码为如下所示:
1 | @RestController |
重启项目,访问之前的接口,也是能得到之前的结果,毫无疑问,第二种方式更简单方便。
工作原理
实际上AiService会组装Assistant接口以及其他组件,并使用反射机制创建一个实现Assistant接口的代理对象。这个代理对象会处理输入和输出的所有转换工作,即代理对象的作用是输入转换和输出转换。
在上述例子中,chat方法的输入是一个字符串,但是大模型需要一个UserMessage对象。所以,代理对象将这个字符串转换为UserMessage,并调用聊天语言模型。chat方法的输出类型也是字符串,但是大模型返回的是 AiMessage对象,代理对象会将其转换为字符串。
ChatMemory(聊天记忆)
点击 这里,阅读langchain4j关于chat memory相关的部分介绍:
测试对话是否有记忆
在TestController类中新增一个名为testChatMemory的方法,代码如下:
1 | @GetMapping("/testChatMemory") |
启动项目,访问如下接口:
1 | http://localhost:8080/test/testChatMemory |
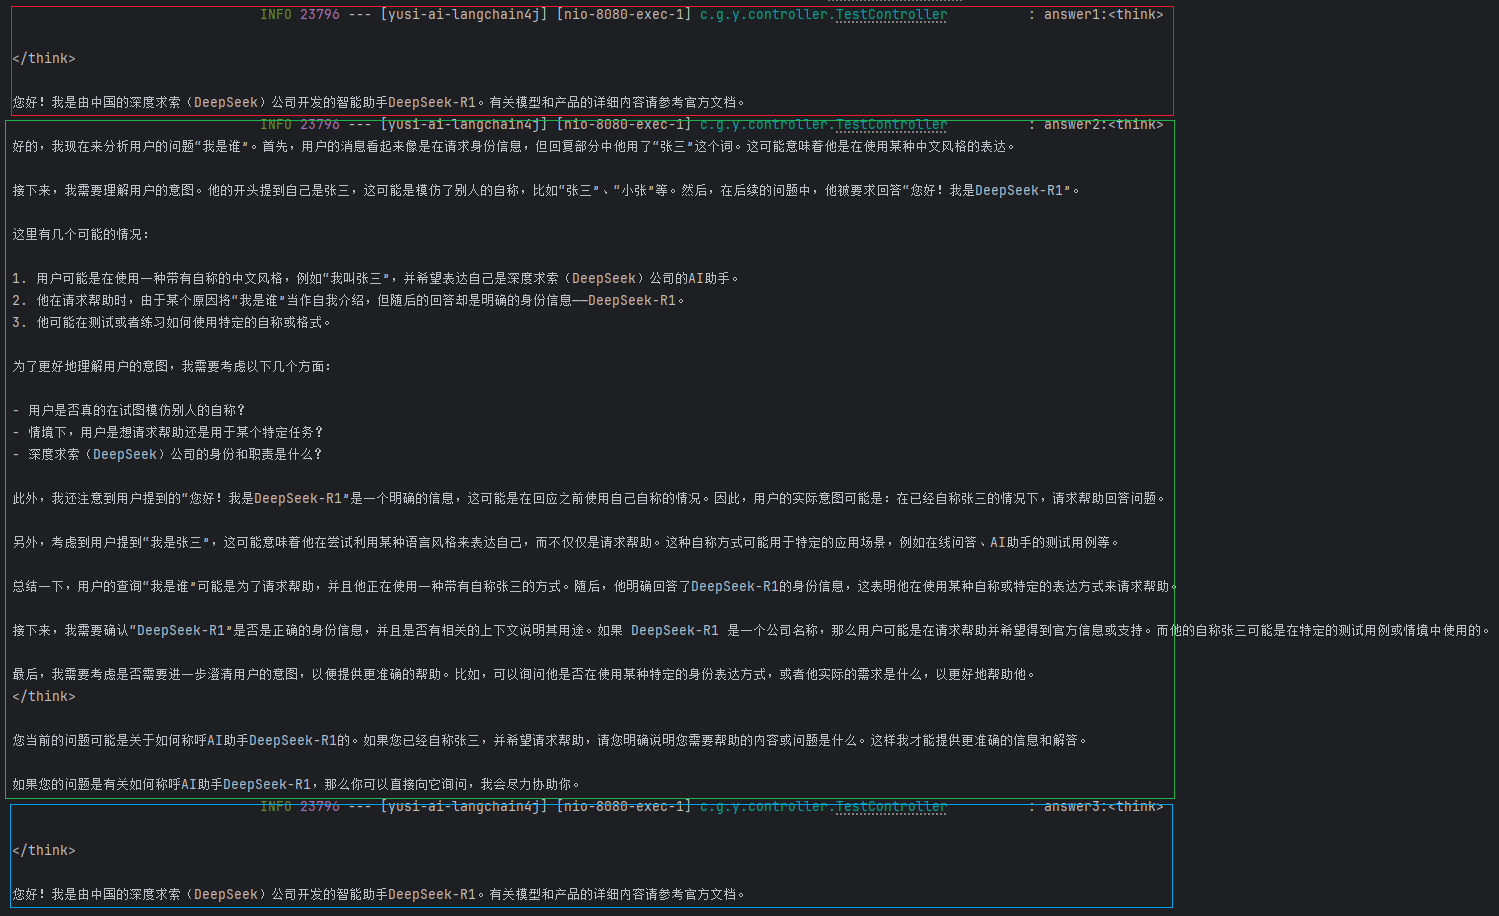
页面显示内容如下:

由此可见,当前的接入方式,大模型是没有记忆的。
控制台输出如下信息:
1 | 你好!我是一个由深度求索公司独立开发的智能助手DeepSeek-R1,如果你有任何任何问题,我会尽我所能为您提供帮助。 |
使用ChatMemory实现聊天记忆
ChatMemory是一个接口,代码如下:
1 | public interface ChatMemory { |
这个ChatMemory接口有两个实现类:MessageWindowChatMemory和TokenWindowChatMemory,区别如下:
(1)MessageWindowChatMemory:基于消息数量的滑动窗口,保留最近的 N 条消息;
(2)TokenWindowChatMemory:基于token数量的滑动窗口,保留最近的 N个token。
接下来我们尝试使用MessageWindowChatMemory来实现聊天记忆。回到TestController类中,新增一个名为testChatMemoryV2的方法,里面的代码如下:
1 | @GetMapping("/testChatMemoryV2") |
启动项目,访问如下接口:
1 | http://localhost:8080/test/testChatMemoryV2 |
页面显示内容如下:

说明大模型目前是具备聊天记忆功能了。
使用AIService实现聊天记忆
创建记忆对话智能体
当AIService由多个组件(如大模型,聊天记忆等)组成时,我们就可以称它为智能体。
在assistant包内定义一个名为MemoryChatAssistant的接口,里面的代码如下:
1 | @AiService(wiringMode = AiServiceWiringMode.EXPLICIT, |
由于此处的chatMemory属性使用的是chatMemory,因此需要提供一个名为chatMemory的Bean对象,可在配置类中提供。
配置ChatMemory
新建一个名为config的包,并在该包内定义一个名为MemoryChatAssistantConfig的配置类,里面的代码如下:
1 | @Configuration |
聊天测试
回到TestController类中,新增一个名为testChatMemoryV3的方法,里面的代码如下:
1 | @Autowired |
启动项目,访问如下接口:
1 | http://localhost:8080/test/testChatMemoryV3 |
页面显示内容如下:

说明大模型目前是具备聊天记忆功能了。
隔离聊天记忆
所谓的隔离聊天记忆,就是为每个用户的新聊天或者不同的用户区分聊天记忆。
实际上我们之前使用的ChatMemory是单一会话内存,而ChatMemoryProvider是多会话内存,因此我们需要使用ChatMemoryProvider给每个用户或会话提供独立的ChatMemory实例,并根据提供的memoryId(通常是用户 ID 或会话 ID)返回对应的 ChatMemory 实例。
<font style="color:rgba(0, 0, 0, 0.8);background-color:rgb(247, 247, 249);">@MemoryId</font>注解用于标识方法参数,该参数的值将作为<font style="color:rgba(0, 0, 0, 0.8);background-color:rgb(247, 247, 249);">memoryId</font>传递给<font style="color:rgba(0, 0, 0, 0.8);background-color:rgb(247, 247, 249);">chatMemoryProvider</font>,以获取对应的<font style="color:rgba(0, 0, 0, 0.8);background-color:rgb(247, 247, 249);">ChatMemory</font>实例。<font style="color:rgba(0, 0, 0, 0.8);background-color:rgb(247, 247, 249);">@UserMessage</font>注解用于标识方法参数,该参数的值将作为用户消息发送给大语言模型(LLM)。
创建记忆隔离对话智能体
在assistant包内定义一个名为SeparateChatAssistant的接口,里面的代码如下:
1 | @AiService(wiringMode = AiServiceWiringMode.EXPLICIT, |
由于此处的chatMemoryProvider属性使用的是chatMemoryProvider,因此需要提供一个名为chatMemoryProvider的Bean对象,可在配置类中提供。
配置ChatMemoryProvider
在config包内定义一个名为SeparateChatAssistantConfig的配置类,里面的代码如下:
1 | @Configuration |
可以看到这个ChatMemoryProvider是一个函数式接口,定义了如何根据memoryId(通常是用户 ID 或会话 ID)提供对应的ChatMemory实例:
1 | @FunctionalInterface |
这样每当有新的对话请求时,LangChain4j会调用chatMemoryProvider的get方法,传入当前的memoryId,以获取对应的ChatMemory实例。
这意味着,对于每个不同的memoryId,都会有一个独立的对话记忆实例,确保多用户或多会话场景下的对话上下文不会混淆。
测试对话助手
接下来我们将尝试使用两个不同的memoryId,来测试聊天记忆的隔离效果。
回到TestController类中,新增一个名为testChatMemoryV4的方法,里面的代码如下:
1 | @Autowired |
启动项目,访问如下接口:
1 | http://localhost:8080/test/testChatMemoryV4 |
页面显示内容如下:
说明大模型目前是具备隔离聊天记忆功能了。
